
FOR the past the past 30 years, I’ve been fortunate to be able to work mainly from home, rather than in an office environment and commuting every day.
Luckily, my employers have felt an office appearance once or twice a week was sufficient, and in any event, the job required a degree of travel to other parts of the country, so I couldn’t be in two places at once!
The fact I was attuned to a home working environment and the flexibility it can bring, was evident during the Covid-19 pandemic, as very little adaptation was needed.
The pandemic has led to a lot more people working from home, and brought with it other difficulties – a suitable and comfortable workspace, children and pets at home and being a disciplined worker. Best not go down the route of how some employers, including some of the UK’s biggest, have failed miserably to engage in any occupational health assessments on staff as to their workspace needs!
My home workplaces in the past have included a conservatory (too hot in summer with a south facing garden, too cold in winter without heat) and a small 3m x 3m office, built on the back of the garage. This was originally designed as a photographic darkroom, so had very small windows and no view. Bars over the window would have been appropriate!
Prior to my conversion to digital photography from 2002 (I was an early convert) there was considerable use of black & white images in the publishing sector I worked for, The Railway Magazine, and I did my own processing and printing.
Even after the darkroom benches were removed and replaced with a desk and some Ikea 'Billy' bookshelves arranged in a ‘L’ formation, space remained at a premium.
Planning for a log cabin
On moving home in 2017, at the new property there was space in an area hidden by some trees and shrubs where it was mainly soil, nothing grew as it was too shaded. This area was first pencilled in as a ‘home office space’ when viewing the house, but never really progressed because a ‘contingency plan’ was working.
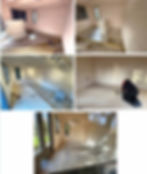
Needing continuity of a place to work, the 'contingency' consisted of working on a small upstairs landing where there was space for an ‘L’ shaped desk, a printer, scanner, some office equipment as well as space for around 20 or so key reference books. All my other books, including a 90-year run of bound issues of The Railway Magazine, were housed in a 9ft x 6ft shed subject to wide temperature variations – not ideal conditions at all.

The 'contingency' plan. Cramped, workspace low headroom and not ideal.
There was also some stuff in the garage. Spreading your work items over three places was far from perfect, but was a compromise at the time with the Domestic Authorities. It was an arrangement which lasted more than three years, however, a growing interest in railwayana the risk of deterioration of items in the shed through damp and lack of ventilation brought matters to a head. Hence the log cabin plan.
Preparation

Another view of the space which was available. The string and canes made the area look like a crime scene!
Having measured the space available, looking at the possibilities several options emerged:
1) Move house to somewhere bigger.
2) Convert the garage to two-thirds office, one third workshop.
3) Build an extension on the side of the house
4) Build a log cabin the garden
Each option was roughly costed and assessed for practicality, disruption, as well as value for money.
Option 1 seemed crazy after only three years in a house we love and is so convenient for the local town.
.
Option 2 gave rise to the problem of where to store what was in the garage. Few of us put cars inside garages these days, they tend to become overflow storerooms. The changes would need to comply with building regulations and probably need planning permission too, and I had reservations about possible structural issues as a result of large tree roots nearby.
Option 3 would have been on the side of the house in an area of approx. 7m x 3.5m but would have meant the loss of two side windows in the lounge along with other costly construction issues to create an aesthetically pleasing extension, which did not look tacked on or bodged.
This left option 4, a log cabin, as the garden was big enough. A cabin would also add future saleability with the increase in home working as the room could be used as a home office, workshop, mancave, home bar, gymnasium, playroom or even beauty parlour.
Research and next steps
Fortunately, there were several garden centres and outdoor building specialists nearby where cabins could be viewed.
I looked at a number of cabins from several manufacturers, focussing on the quality of build, how substantial they appeared, how the display cabins had weathered, internal heights and sizes, the cost and how pushy the sales staff were. I also checked online reviews which was an eye-opener, some better than others in respect of customer service..
With many cabins, I found they came in fixed sizes with doors and windows in set places. This was not ideal for my location, as I had a specific space in which to shoehorn the cabin. A smaller cabin footprint would probably be cramped inside, while a larger building would have encroached on a 6oft tree as well as the rear wall of the garage, and almost certainly would have need planning permission.
Generally speaking, planning consent is needed if the building height exceeds 2.5 metres high, is within two metres of a boundary fence and exceeds 15 sq/metres in floor area. So to work within permitted development rights without planning, I kept the size under 2.5 metres and 15sq meters in area. Check your local authority requirements as land inside National Parks, the Broads, Areas of Outstanding Natural Beauty could be different.
So after several visits to view buildings, specs and prices, I settled on a Dutch manufacturer called LUGARDE. Having looked at several of their buildings, I found the quality and finish was very good.

Lugarde's online configurator, where you can add/delete/move features as required, with the change in cost in real time too.
Choosing Lugarde came with a big plus. They were the only manufacturer I was aware of who offered an online configurator where you could take a basic square or rectangular shaped building and customise it. Windows and doors could be placed and inserted in position the customer wants, walls extended too. For me, this was ideal. I could maximise the floor area within the land available, but I could also choose the height, door and window positions, all without have the faff of planning permission.
What’s more the configurator allows you to create a 3D view and rotate your finished design and print it. As you add doors and windows, a menu pricing system updates in real time, so no nasty surprises. While the cost may have been a little more than an off-the shelf design, price was never a primary consideration, so always go as big as you can.

How my final design looked - or was expected to!
It’s worth adding that Lugarde cabins come in 28mm, 44mm and 68mm wall thicknesses – the thicker the wall, the more useable it is all year round. My cabin is 44mm, but has insulation – more of that later.
Fired up and excited I’d designed my new home office/hobby room, an order was placed with my local dealer, Bentley's Garden Buildings in Leicester. It was a this point the euphoria dipped as I learnt the delivery times had moved from 8-12 weeks in June 2020 when I first enquired, to 16-20 weeks because of a combination of coronavirus and social distancing at the factory, but also because so many other people had switched to working from home, order books had swelled. This was also evidenced by other manufacturers who had sold out of certain sized cabins.
Any building supplier will offer the option of taking control of all aspects of construction – dig out base, build the cabin, install electrics etc – or if you are a competent DIYer, there is a fair bit you can do yourself to keep costs down.
In my case, my go-to DIY man, Graham, was happy to do as much or as little as I wanted, and we agreed, he’d do most of the base, we’d share the cabin construction and he’d finish any landscaping.
The Base
First stage was to clear the area, so our gardeners moved several plants to elsewhere.
Next Graham from DIWHY Solutions started digging out the base. Digging was by hand in order to minimise the risk of damage to nearby tree roots. As you’d expect, digging down an area 4.5m x 3.5m for a 10cm depth produces a lot of soil which was distributed elsewhere around the garden. Additionally, the lay of the land was on a slight gradient, so the dig appeared deeper at one end as part of the process to get it level.
It can’t be stressed enough how important it is to have a level base. Anything less will put strain on the logs and is likely to lead to gaps opening between the logs.

From top: The cleared land; digging out the base; installing the road form and adding the MoT sub base.
To create the shuttering for the base, Graham used what is called ‘road form’, square edged girders. These can be hired and tend to be better than wood shuttering as they give a cleaner, more professional finish.
Next came the MOT sub-base, limestone sized from 40mm down to dust and used as a bulk fill, a levelling material. The base needed 2 tons. This was compacted with a vibrating plate to make the sub-base ready for the concrete.
There are several ways of laying the concrete base including mixing yourself, but for a big base, this can create a lot of hard work and is likely to need extra shuttering. There’s also the consideration of what happens if the mixer breaks down or you run out of materials – which are in short supply at present.
So, this left an order for ready mixed concrete – there are online calculators which help – but bear in mind if you miscalculate, you could be left with too little or a surplus.
For my cabin, we used Tippers of Nuneaton, a firm who turn up in a truck and mix it there and then, by the barrow load. You just need a few mates with wheelbarrows to take it from the truck to site, convoy style. The benefit is you pay for exactly what you use, even if it is marginally more expensive.
With the concrete in place, tamped and checked the base was level, it was covered with a tarpaulin and left to set.

After the MoT, add the poly membrane. Next comes the concrete, mixed outside the house by the barrow load, and finally, a nicely tamped base, about to be covered and left to cure.
The Cabin Build
So you’ve an idea of timescales, the cabin was ordered on September 1, 2020, the base dug and laid November 25-27 (this was timed to avoid frosty weather, but with plenty of time for the base to ‘cure’), and the cabin was delivered to site on January 27, 2021. Construction began the following week.
My cabin was delivered by a Dutch truck driver who had collected a loaded trailer from Harwich port. As I live down a narrow lane with no HGV turning space, the driver parked on a nearby main road and used a 'Moffett' to unload and deliver the palletised materials.

From truck to garden. The cabin comes well packed on pallets.
Before you build it is advantageous to lay out the logs for the walls into their respective sizes and check for any warping. Warped logs should be placed lower down so there’s more weight on them.
So for the build, the first job is to lay the tanalised foundation beams, check they are level and flat as well as crosscheck the measurements on the diagonals. Next come the first logs – a couple are usually machined differently – and then you begin the interlocking of the walls as you build it up. Place the window and doors after around six or seven logs, otherwise they become awkward to lift. The doors and frame is particularly heavy.

From top left: The logs sit on the tanalised beams (darker wood) which sit on the poly membrane and keeps out moisture. The instructions will show when to install the windows and door frame. Continue adding and interlocking the logs, then the purlins, T&G roof boards and you should have something that looks like the last picture. Here the fascia boards are also in place and the EPDM roof covering is being glued down.
There are some simple instructions (pictogram style, but also watch the Lugarde videos online and you will quickly get the hang of how it all goes together.
It’s like Lego really, work your way up with the walls, checking each log is interlocked and level, up to roof level, before inserting the joists and tongue & groove for the roof. If you’ve decided on roof insulation (I used 50mm Celotex), install it before you start finishing the roof with the EPDM (ethylene propylene diene monomer) roof sheet. This is a rubberised sheet, glued down, and is tough and durable, with a 25 year life. There’s the facia boards and roof trim to install, both of which will need cutting to size, and probably clamping to screw in.
So by this point, you should have a building, but no floor. The floor goes in last on top of any insulation. It's also worth considering installing the electrics before the floorboards are nailed down as it can give a really tidy finish with the cables well hidden or in plastic conduit from the edge trim, as mine are.
As the cost of insulation is small, it is wise to install underfloor insulation, and you can buy 2400mm x 1200mm sheets or the 1200mm x 450mm size sheets I used which fit in an family SUV. The Lugarde video shows how it’s done.
From top left: The insulation ready to lay; installing the insulation then a floor joist which is screwed in, and repeat across the process across the floor. Next comes the tongue & groove floorboards, best nailed down. Finally, the floor is stained and varnished - two coats of each.
For the electrics, I used a qualified local contractor, who assessed the power to the garage and my needs (six double sockets and three lighting circuits – one for outside). We did need a new consumer unit in the garage but the result was a very good and tidy job.
For the floor, to paint the tongue and groove, I opted for a grey shade of Sadolin (bought two sample pots of different shades from a decorators merchant), tested on scrap wood before applying with lint-free rag (pic 4 above). When dry, added two coats of polyurethane varnish, and the job’s a good ‘un as they say.

The result: One completed log cabin.
Update - January 2022
It's now a year since construction and the building has been perfect. Only needed a slight adjustment on one door.
The only other thing I have done is paint the outside. When the order was places, I specified 'pre-treatment' white, which lasted until the summer which was an ideal time to paint.
I used Sadolin Super Dec paint, which will give many years protection. MY chosen colours were Old English White for the main structure and Smoke Grey for the doors and windows.
This is the finished and painted version.

To come: The internal cabin fit out and how to build yourself a desk.